Debugging a mystery: ssh causing strange exit codes?
May 18th, 2017
Recently we had a WTF moment at a customer of mine which is worth sharing.
In an automated deployment procedure we’re installing Debian systems and setting up MySQL HA/Scalability. Installation of the first node works fine, but during installation of the second node something weird is going on. Even though the deployment procedure reported that everything went fine: it wasn’t fine at all. After bisecting to the relevant command lines where it’s going wrong we identified that the failure is happening between two ssh/scp commands, which are invoked inside a chroot through a shell wrapper. The ssh command caused a wrong exit code showing up: instead of bailing out with an error (we’re running under ‘set -e‘) it returned with exit code 0 and the deployment procedure continued, even though there was a fatal error. Initially we triggered the bug when two ssh/scp command lines close to each other were executed, but I managed to find a minimal example for demonstration purposes:
# cat ssh_wrapper
chroot << "EOF" / /bin/bash
ssh root@localhost hostname >/dev/null
exit 1
EOF
echo "return code = $?"
What we’d expect is the following behavior, receive exit code 1 from the last command line in the chroot wrapper:
# ./ssh_wrapper
return code = 1
But what we actually get is exit code 0:
# ./ssh_wrapper
return code = 0
Uhm?! So what’s going wrong and what’s the fix? Let’s find out what’s causing the problem:
# cat ssh_wrapper
chroot << "EOF" / /bin/bash
ssh root@localhost command_does_not_exist >/dev/null 2>&1
exit "$?"
EOF
echo "return code = $?"

# ./ssh_wrapper
return code = 127
Ok, so if we invoke it with a binary that does not exist we properly get exit code 127, as expected.
What about switching /bin/bash to /bin/sh (which corresponds to dash here) to make sure it’s not a bash bug:
# cat ssh_wrapper
chroot << "EOF" / /bin/sh
ssh root@localhost hostname >/dev/null
exit 1
EOF
echo "return code = $?"

# ./ssh_wrapper
return code = 1
Oh, but that works as expected!?
When looking at this behavior I had the feeling that something is going wrong with file descriptors. So what about wrapping the ssh command line within different tools? No luck with `stdbuf -i0 -o0 -e0 ssh root@localhost hostname`, nor with `script -c “ssh root@localhost hostname” /dev/null` and also not with `socat EXEC:”ssh root@localhost hostname” STDIO`. But it works under unbuffer(1) from the expect package:
# cat ssh_wrapper
chroot << "EOF" / /bin/bash
unbuffer ssh root@localhost hostname >/dev/null
exit 1
EOF
echo "return code = $?"

# ./ssh_wrapper
return code = 1
So my bet on something with the file descriptor handling was right. Going through the ssh manpage, what about using ssh’s `-n` option to prevent reading from standard input (stdin)?
# cat ssh_wrapper
chroot << "EOF" / /bin/bash
ssh -n root@localhost hostname >/dev/null
exit 1
EOF
echo "return code = $?"

# ./ssh_wrapper
return code = 1
Bingo! Quoting ssh(1):
     -n      Redirects stdin from /dev/null (actually, prevents reading from stdin).
             This must be used when ssh is run in the background.  A common trick is
             to use this to run X11 programs on a remote machine.  For example,
             ssh -n shadows.cs.hut.fi emacs & will start an emacs on shadows.cs.hut.fi,
             and the X11 connection will be automatically forwarded over an encrypted
             channel.  The ssh program will be put in the background.  (This does not work
             if ssh needs to ask for a password or passphrase; see also the -f option.)
Let’s execute the scripts through `strace -ff -s500 ./ssh_wrapper` to see what’s going in more detail.
In the strace run without ssh’s `-n` option we see that it’s cloning stdin (file descriptor 0), getting assigned to file descriptor 4:
dup(0)            = 4
[...]
read(4, "exit 1\n", 16384) = 7
while in the strace run with ssh’s `-n` option being present there’s no file descriptor duplication but only:
open("/dev/null", O_RDONLY) = 4
This matches ssh.c’s ssh_session2_open function (where stdin_null_flag corresponds to ssh’s `-n` option):
        if (stdin_null_flag) {
                in = open(_PATH_DEVNULL, O_RDONLY);
        } else {
                in = dup(STDIN_FILENO);
        }
This behavior can also be simulated if we explicitly read from /dev/null, and this indeed works as well:
# cat ssh_wrapper
chroot << "EOF" / /bin/bash
ssh root@localhost hostname >/dev/null </dev/null
exit 1
EOF
echo "return code = $?"

# ./ssh_wrapper
return code = 1
The underlying problem is that both bash and ssh are consuming from stdin. This can be verified via:
# cat ssh_wrapper
chroot << "EOF" / /bin/bash
echo "Inner: pre"
while read line; do echo "Eat: $line" ; done
echo "Inner: post"
exit 3
EOF
echo "Outer: exit code = $?"

# ./ssh_wrapper
Inner: pre
Eat: echo "Inner: post"
Eat: exit 3
Outer: exit code = 0
This behavior applies to bash, ksh, mksh, posh and zsh. Only dash doesn’t show this behavior.
To understand the difference between bash and dash executions we can use the following test scripts:
# cat stdin-test-cmp
#!/bin/sh

TEST_SH=bash strace -v -s500 -ff ./stdin-test 2>&1 | tee stdin-test-bash.out
TEST_SH=dash strace -v -s500 -ff ./stdin-test 2>&1 | tee stdin-test-dash.out

# cat stdin-test
#!/bin/sh

: ${TEST_SH:=dash}

$TEST_SH <<"EOF"
echo "Inner: pre"
while read line; do echo "Eat: $line"; done
echo "Inner: post"
exit 3
EOF

echo "Outer: exit code = $?"
When executing `./stdin-test-cmp` and comparing the generated files stdin-test-bash.out and stdin-test-dash.out you’ll notice that dash consumes all stdin in one single go (a single `read(0, …)`), instead of character-by-character as specified by POSIX and implemented by bash, ksh, mksh, posh and zsh. See stdin-test-bash.out on the left side and stdin-test-dash.out on the right side in this screenshot:
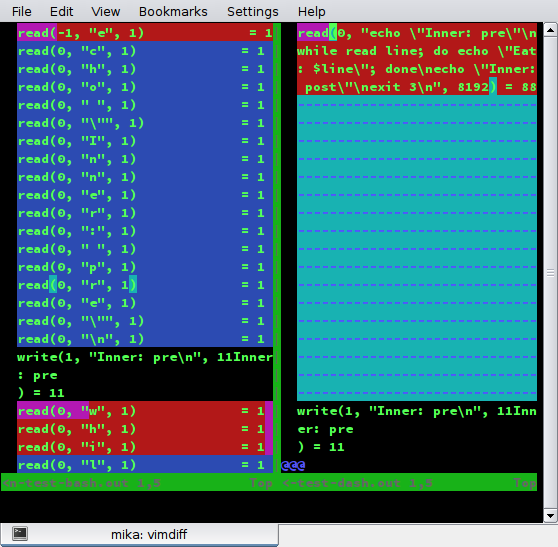
So when ssh tries to read from stdin there’s nothing there anymore.
Quoting POSIX’s sh section:
When the shell is using standard input and it invokes a command that also uses standard input, the shell shall ensure that the standard input file pointer points directly after the command it has read when the command begins execution. It shall not read ahead in such a manner that any characters intended to be read by the invoked command are consumed by the shell (whether interpreted by the shell or not) or that characters that are not read by the invoked command are not seen by the shell. When the command expecting to read standard input is started asynchronously by an interactive shell, it is unspecified whether characters are read by the command or interpreted by the shell.
If the standard input to sh is a FIFO or terminal device and is set to non-blocking reads, then sh shall enable blocking reads on standard input. This shall remain in effect when the command completes.
So while we learned that both bash and ssh are consuming from stdin and this needs to prevented by either using ssh’s `-n` or explicitly specifying stdin, we also noticed that dash’s behavior is different from all the other main shells and could be considered a bug (which we reported as #862907).
Lessons learned:
- Be aware of ssh’s `-n` option when using ssh/scp inside scripts.
- Feeding shell scripts via stdin is not only error-prone but also very inefficient, as for a standards compliant implementation it requires a read(2) system call per byte of input. Instead create a temporary script you safely execute then.
- When debugging problems make sure to explore different approaches and tools to ensure you’re not relying on a buggy behavior in any involved tool.
Thanks to Guillem Jover for review and feedback regarding this blog post.