August 26th, 2006
Now I’m back again. Sorry for the downtime of grml.org and michael-prokop.at, the server was running out of mem (thanks to Robert for bringing it up again). A server upgrade will follow in the near future anyway.
Now 3746 unread blogpostings, 716 mails in my inbox, lots of unread mailinglists and newsgroups are waiting for me… Sorry for delays, but I’ll answer all your mails within in the next few days.
Posted in Allgemein, English, Events | Comments Off on Online again…
August 15th, 2006
JFYI: I’ll be offline for holidays in the next few days. I won’t be reachable via phone nor via instant messaging nor via irc nor via mail.
EOF
Posted in Allgemein, English | Comments Off on JFYI: Offline for holidays
August 13th, 2006

Viel Arbeit war’s, nun ist es soweit: grml gibt es in einer neuen Version.
Wir haben X.org 7.0, es gibt 117 neue Pakete. Eine neue Schriftart macht das Leben auf der Konsole noch angenehmer. Die Window-Manager fvwm-crystal und dwm sind dabei. Wer sich mit dem Thema TPM (Trusted Platform Module) beschäftigen will, kann dies – auch ohne entsprechender Hardware – dank grml-tpm, dem tpm-emulator und den tpm-tools machen. UMTS Vodafone-Karten funkionieren für österreichische Provider Out-of-the-Box (siehe ‘grml-tips umts’). Tools wie ntfsresize, ntfsclonse, ntfsmount gehören zum Alltag vieler Admins, jetzt gibt es auch ntfs-3g um mit NTFS hantieren zu können.
Es gibt noch viiiiiiiele weitere Neuigkeiten, mehr Infos sind im offiziellen Release-Announcement zu finden.
Happy hacking und viel Spaß mit der neuen Release! Mess with the best – suck like the rest!
Posted in Computer, Links | 2 Comments »
August 11th, 2006
Given: server with SCSI disk for the system plus a SCSI storage in the back. The SCSI disk uses another driver than the SCSI storage. Installing Debian etch via grml is no problem, the system disk is /dev/sda, the SCSI storage is bound to /dev/sdb. But: who guarantees that /dev/sda is always the systemdisk? Using the Debian-kernel with initramfs isn’t capable of booting the system via root=/dev/sda1 because /dev/sda1 corresponds to the SCSI storage. (Side-note: the grml-kernel does not have this problem, it just boots the system without any problems at all. 8-))
Generic solution: use the power of UUID:
root@grml # /lib/udev/vol_id /dev/sda1 | grep UUID
ID_FS_UUID=4a6aed11-42dd-4c82-81ce-8f469e93f210
root@grml # eval $(/lib/udev/vol_id /dev/sda1 | grep UUID)
root@grml # ls -la /dev/disk/by-uuid/$ID_FS_UUID
lrwxrwxrwx 1 root root 10 Aug 10 11:01 /dev/disk/by-uuid/4a6aed11-42dd-4c82-81ce-8f469e93f210 -> ../../sda1
Now we know the UUID and boot the system via root=UUID=… instead of a root=/dev/sda-entry:
title           Debian Etch, kernel 2.6.15-1-686 (on /dev/sda1)
root            (hd0,0)
kernel          /boot/vmlinuz-2.6.15-1-686 root=UUID=4a6aed11-42dd-4c82-81ce-8f469e93f210 ro
initrd          /boot/initrd.img-2.6.15-1-686
Finally do not forget to adjust /etc/fstab as well for all entries:
UUID=e0164f78-9821-4eaf-bda7-1fd9b43a6f06 /     ext3  defaults,errors=remount-ro 0 1
UUID=4a6aed11-42dd-4c82-81ce-8f469e93f210 /home ext3  defaults                   0 0
UUID=0e88f32f-fb98-4279-b3bc-8edfc2046b5d none  swap  sw                         0 0
Posted in Computer, English, Hardware | 2 Comments »
August 11th, 2006
Want to install Debian etch? But the Debian etch-ISO does not detect all the necessary hardware? Or it even does not boot at all? Or you just can’t find your Debian etch CD-ROM? Or having $ANOTHER_PROBLEM? Use grml. :-)
Take a look at my Debian etch via grml Howto.
You can get this tip via ‘grml-tips etch’ on your grml system. Of course ‘grml-tips sarge’ (Install Debian sarge via grml) is supported as well.
Posted in Computer, English, Links | 1 Comment »
August 8th, 2006
A RedHat 9 server had problems with its rpm database. Running strace showed that it’s hanging when accessing /var/lib/rpm/Packages (a Berkeley DB, wondering?). No rpm actions were possible anymore. Solution:
# cd /var/lib
# cp -a rpm rpm.backup
# rm -f /var/lib/rpm/__db*
# rpm -vv --rebuilddb
Posted in Computer, English, Rants | 1 Comment »
August 1st, 2006
Yes, online resizing isn’t possible just with xfs but starting with Linux kernel 2.6.10 you can do it with ext3 as well. With e2fsprogs >=1.39-1 new filesystems are created with directory indexing and on-line resizing enabled by default (see /etc/mke2fs.conf).
A short demo how online-resizing running on top of LVM works:
cfdisk /dev/hda                           # create a partition with type 8e (lvm)
pvcreate /dev/hda2                        # create a physical volume
vgcreate resize_me /dev/hda2              # create volume group
lvcreate -n resize_me -L100 resize_me     # create a logical volume
mkfs.ext3 /dev/resize_me/resize_me        # now create a new filesystem
mount /dev/resize_me/resize_me /mnt/test  # mount the new fs for demonstrating online resizing
df -h                                     # check the size of the partition
lvextend -L+100M /dev/resize_me/resize_me # let's extend the logical volume
resize2fs /dev/resize_me/resize_me        # and finally resize the filesystem
df -h                                    # recheck the size of the partition -> we now have a filesystem with ~200MB
This also works for Software-RAID (thanks to ‘growing ext3 partition on RAID1 without rebooting’ for the hints):
mdadm --create --verbose /dev/md0 --level=raid1 --raid-devices=2 /dev/hda2 /dev/hdb1
mkfs.ext3 /dev/md0
mount /dev/md0 /mnt/test
mdadm /dev/md0 --fail /dev/hda2 --remove /dev/hda2
cfdisk /dev/hda                                  # adjust partition size for hda2
mdadm /dev/md0 --add /dev/hda2
mdadm /dev/md0 --fail /dev/hdb1 --remove /dev/hdb1
cfdisk /dev/hdb                                  # adjust partition size for hdb1
mdadm /dev/md0 --add /dev/hdb1
mdadm --grow /dev/md0 --size=max
resize2fs /dev/md0
Notice: online resizing works as soon as the kernel can re-read the partition table. So it works for example with LVM and SW-RAID but not with a plain device (/dev/[sh]d*). Even though using partprobe, the kernel does not re-read the partition table if the device is already mounted. So I could not find a way to online-resize a “plain partition”. (Please let me know if I missed something.)
Anoter note: resizing SW-RAID5 is possible with CONFIG_MD_RAID5_RESHAPE and kernel 2.6.17.
BTW: you should know Zugschlus’ german notes regarding LVM.
Posted in Computer, English, Hardware | Comments Off on ext3 online resizing
August 1st, 2006
Just feeding google and interested readers. DRI worked with X.org 6.9 but with version 7.0 it’s failing?
% LIBGL_DEBUG=verbose glxgears
libGL: XF86DRIGetClientDriverName: 1.5.1 i915 (screen 0)
libGL: OpenDriver: trying /usr/lib/dri/i915_dri.so
libGL error: dlopen /usr/lib/dri/i915_dri.so failed (/usr/lib/dri/i915_dri.so: cannot open shared object file: No such file or directory)
libGL error: unable to find driver: i915_dri.so
Ok, missing libgl1-mesa-dri of course. But when running glxinfo after installing the package you might notice something like:
ERROR! sizeof(I830DRIRec) does not match passed size from device driver
Solution (thanks for hint, formorer!):
apt-get install libgl1-mesa-dri/experimental libgl1-mesa-glx/experimental
Useful resources:
Posted in Computer, English, Hardware | Comments Off on Problems running DRI with current X.org on Debian/unstable?
July 28th, 2006
11:32  *  mikap geht mittagessen... cul
[....]
11:36  *  vk hat Hunger und wartet schon auf mikap ...
11:36 < wuehlmaus> das hoert sich irgendwie kannibalistisch an  :)
[...]
12:46  *  vk ist satt. mikap wird wohl jetzt einige Zeit nicht mehr hier mittippen ... <rülps>
Posted in Allgemein | 1 Comment »
July 28th, 2006
Don’t forget – today (on 28th of july) we have the System Administrator Appreciation Day!
Thanks for reminder, koki :)
Posted in Computer, English, Events | Comments Off on System Administrator Appreciation Day
July 25th, 2006
Because it’s definitely worth a read: the proceedings of the Linux Symposium 2006 are now available for download (direct links: Volume 1, Volume 2 – PDF). Have a nice week reading them. :-)
Posted in Computer, English, Events, Links | Comments Off on Linux Symposium 2006
July 19th, 2006
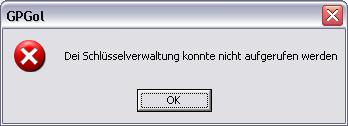
Wo ist jetzt nur “mei” Schlüsselverwaltung?
Posted in Computer, Rants | 3 Comments »
July 17th, 2006
We already have one Sun Sparc running at Robocup @ TUG:
mika@robosparc ~ % cat /proc/cpuinfo
cpu             : TI UltraSparc I   (SpitFire)
fpu             : UltraSparc I integrated FPU
promlib         : Version 3 Revision 1
prom            : 3.1.3
type            : sun4u
ncpus probed    : 1
ncpus active    : 1
Cpu0Bogo        : 397.31
Cpu0ClkTck      : 000000000bebc200
MMU Type        : Spitfire
Now we got another one and I’d like to document the necessary steps for installing Debian on such a box (in case Mabu and me have to install a third one ;-)):
mika@sunkist ~ % cat /proc/cpuinfo
cpu             : TI UltraSparc II  (BlackBird)
fpu             : UltraSparc II integrated FPU
promlib         : Version 3 Revision 7
prom            : 3.7.0
type            : sun4u
ncpus probed    : 1
ncpus active    : 1
Cpu0Bogo        : 589.82
Cpu0ClkTck      : 0000000011a49a00
MMU Type        : Spitfire
We used the netboot installer (as CD-ROM did not work – as usual ;-)) to install Debian-Sparc. We configured rarpd (adjust /etc/ethers) and atftpd (provide the netboot image, in our case it was /opt/tftpboot/ and create a symlink based on the mac address of the computer you want to install).
Press Stop-A to interrupt the booting sequence, use ‘boot net’ to boot via network and then it’s pretty straight forward. d-i worked without any serious problems, just the console was somewhat b0rken. After installing GNU screen and zsh and grml‘s configuration files working on the box is comfortable. 8-)
Helpful ressources:
Posted in Computer, English, Hardware, Links | Comments Off on Debian on UltraSparc II
July 13th, 2006
Gentoo-Entwickler Wernfried ‘amne’ Haas hat für Leute vom Security Treff Graz und grml-Entwickler einen Workshop zu IRC und dem Konsolenclient irssi gehalten.
22:27 < amnemobil>  20:28:02 up 78 days, 18:41, 58 users,  load average: 2.83, 1.85, 1.69
22:27 < amnemobil> /exec -o uptime
22:27 < mika_fh>  22:27:43 up  4:17,  0 users,  load average: 0.32, 0.08, 0.02
22:27 < ~dauti>  /exec -o uptime
22:27 < mika_fh> amnemobil: gentoo vs. grml :)
22:28 < mika_fh> 22:28:49 up 359 days,  8:46,  1 user,  load average: 1.00, 0.99, 0.81
22:29 < gebi>  22:29:31 up 48 days, 19 min,  6 users,  load average: 0.01, 0.11, 0.10
22:29 < mika_fh> laecherlschass ;)
22:30 < amnemobil> mieser trollversuch da
22:30 < vk_> lärcherlschaas ... (geht auch mit umlauts *g*)
22:30 < gebi> mika_fh: wird halt hin und wieder upgegraded ;)
22:30 -!- mode/#grml-workshop [+o superamne] by ChanServ
22:31 -!- mika_fh was kicked from #grml-workshop by superamne [du hast die höhere uptime, aber ich hab op]
Für Interessenten habe ich meine Mitschrift vom IRC-Workshop online gestellt. Danke für den schönen Workshop, amne!
Posted in Computer, Events, Links | Comments Off on IRC- und irssi-Workshop
July 6th, 2006
Run ‘apt-get install wikipediafs‘ on your Debian/grml-box.
% cat ~/.wikipediafs/config.xml
<wfs-config>

    <general>

       <article-cache-time>300</article-cache-time>

    </general>

    <sites>

      <site>

        <dirname>wikipedia-de</dirname>

        <host>de.wikipedia.org</host>

        <basename>/w/index.php</basename>

      </site>

      <site>

        <dirname>wikipedia-en</dirname>

        <host>en.wikipedia.org</host>

        <basename>/w/index.php</basename>

      </site>

    </sites>

</wfs-config>
% mount.wikipediafs /wiki

% cat /wiki/wikipedia-en/Cat
Posted in Computer, English, Links | 5 Comments »
July 2nd, 2006
mrxvt ist ein auf rxvt und aterm basierender multi-tabbed X Terminal Emulator. Laut der Projekt-Homepage bietet mrxvt folgende Features:
- multi-tab support
- runtime dynamic tab title
- session support for each tab
- input broadcasting for all tabs
- user configurable keyboard shortcuts
- translucent window support
- pseudo-transparent background per terminal
- pseudo-transparent scrollbar/menubar/tabbar
- background color tinting
- color text shadow
- off-focus background fading
- NeXT/rxvt/xterm/SGI/plain style scrollbar
- user supplied background image per terminal (jpeg/png/xpm)
- user supplied background image for scrollbar/menubar/tabbar (jpeg/png/xpm)
- only depends on X, no GTK, no Qt
- small and fast
- freetype font (xft)
- XIM and multi-languages (Chinese/Korea/Japanese) suppport
- multiple platforms
- utmp/wtmp/lastlog logging
Für mich ist mrxvt vorwiegend eine schlanke Alternative zu der KDE-Konsole. Ich verwende Terminals fast immer im Fullscreen-Modus und möchte zwischen mehreren Terminals auf einem einzelnen Desktop schnell und einfach wechseln können. Mit mrxvt und den Multi-Tabs (strg-shift-n für ein neues Tab, shift-[linker|rechter]-cursor zum Wechseln) bekomme ich genau das. Version 0.4.2 hat sich jetzt bei mir mehrere Monate lang bewährt und wird dementsprechend auch in grml 0.8 Einzug finden. ‘apt-get install mrxvt’ für Debian-User. :)
Posted in Computer, Links | 2 Comments »
July 2nd, 2006
 First of all: thanks a lot to IBM/Lenovo! Michael Gebetsroither and me were working on the ‘Trusted Live Linux’ project at IAIK @ TUG. IBM/Lenovo kindly provided us a Thinkpad T60 1951-44G laptop so we were able to test and work with a TPM v1.2 chip. The results of the project will be available within the next few weeks, stay tuned.
Specifications of the Thinkpad T60 1951-44G:
T2400(1.83GHz), 512MB RAM, 60GB 5400rpm HD, 14.1in 1024x768 LCD,
Intel 950, CDRW/DVD, Intel 802.11abg wireless, Modem, 1Gb Ethernet,
UltraNav, Secure chip, Fingerprint reader, 6c Li-Ion batt
lspci-output:
0000:00:00.0 Host bridge: Intel Corporation Mobile 945GM/PM/GMS/940GML and 945GT Express Memory Controller Hub (rev 03)
0000:00:02.0 VGA compatible controller: Intel Corporation Mobile 945GM/GMS/940GML Express Integrated Graphics Controller (rev 03)
0000:00:02.1 Display controller: Intel Corporation Mobile 945GM/GMS/940GML Express Integrated Graphics Controller (rev 03)
0000:00:1b.0 Audio device: Intel Corporation 82801G (ICH7 Family) High Definition Audio Controller (rev 02)
0000:00:1c.0 PCI bridge: Intel Corporation 82801G (ICH7 Family) PCI Express Port 1 (rev 02)
0000:00:1c.1 PCI bridge: Intel Corporation 82801G (ICH7 Family) PCI Express Port 2 (rev 02)
0000:00:1c.2 PCI bridge: Intel Corporation 82801G (ICH7 Family) PCI Express Port 3 (rev 02)
0000:00:1c.3 PCI bridge: Intel Corporation 82801G (ICH7 Family) PCI Express Port 4 (rev 02)
0000:00:1d.0 USB Controller: Intel Corporation 82801G (ICH7 Family) USB UHCI #1 (rev 02)
0000:00:1d.1 USB Controller: Intel Corporation 82801G (ICH7 Family) USB UHCI #2 (rev 02)
0000:00:1d.2 USB Controller: Intel Corporation 82801G (ICH7 Family) USB UHCI #3 (rev 02)
0000:00:1d.3 USB Controller: Intel Corporation 82801G (ICH7 Family) USB UHCI #4 (rev 02)
0000:00:1d.7 USB Controller: Intel Corporation 82801G (ICH7 Family) USB2 EHCI Controller (rev 02)
0000:00:1e.0 PCI bridge: Intel Corporation 82801 Mobile PCI Bridge (rev e2)
0000:00:1f.0 ISA bridge: Intel Corporation 82801GBM (ICH7-M) LPC Interface Bridge (rev 02)
0000:00:1f.1 IDE interface: Intel Corporation 82801G (ICH7 Family) IDE Controller (rev 02)
0000:00:1f.2 SATA controller: Intel Corporation 82801GBM/GHM (ICH7 Family) Serial ATA Storage Controller AHCI (rev 02)
0000:00:1f.3 SMBus: Intel Corporation 82801G (ICH7 Family) SMBus Controller (rev 02)
0000:02:00.0 Ethernet controller: Intel Corporation 82573L Gigabit Ethernet Controller
0000:03:00.0 Network controller: Intel Corporation PRO/Wireless 3945ABG Network Connection (rev 02)
0000:15:00.0 CardBus bridge: Texas Instruments PCI1510 PC card Cardbus Controller
The system I used for testing was grml 0.7-5, a pre-release of the upcoming version 0.8 with kernel 2.6.17-grml. Results:
- X.org 7.0: works out of the box with the vesa driver (glxgears says 700 FPS), 3d acceleration/DRI should work with X.org 7.1 and i810
- Sound: works out of the box (using snd_hda_intel driver), also the hardware keys for mute/raise/lower work
- CPU frequency scaling: works out of the box (using speedstep_centrino driver)
- CPU hotplug: works with SMP-enabled kernel and ‘echo [0|1] > /sys/devices/system/cpu/cpu1/online’
- WLAN: ipw3495, works out of the box with 2.6.17-grml (the driver is part of it), ipw3945-ucode and ipw3945d
- Temperature: hddtemp /dev/sda works, /proc/acpi/ibm/thermal works via module ibm_acpi, mbmon and sensors don’t return anything yet
- Battery: the /proc/acpi/battery interface works; running about 3.5 hours according to ‘acpi -V’
- SMAPI BIOS: works using tp_smapi
- ThinkLight: works out of the box (it’s hardware controlled)
- FN-keys: hardware controlled keys (e.g. LCD brightness thinklight, sound) work, software controlled keys not out of the box
- On screen display: works using tpb
- Ethernet: I noticed a problem with the e1000 module, you’ll notice the following in the syslog:
e1000: 0000:02:00.0: e1000_probe: The EEPROM Checksum Is Not Valid
e1000: probe of 0000:02:00.0 failed with error -5
This means the checksum in PCI data area is not ok. It seems the windows driver does not have this problem because it does not verify the checksum at all. Of course you could work around the problem by disabling the e1000_validate_eeprom_checksum in e1000_main.c but that’s a nasty workaround. I found a workaround for this without having to touch kernelsource: just set “Internal Network Device: Hidden” in the BIOS. If you reboot again you won’t have a network card of course, but after re-enabling it again in the BIOS the module should work without any problems then.
- TPM: thanks for help to Kylene Hall. We found a way to get it working with 2.6.16-rc5. The patch found its way to 2.6.17 (git-commit) so now it’s working out of the box using the TIS driver (tpm_tis)
- HDAPS: does not work [hdaps: supported laptop not found, driver init failed (ret=-19)]
- Fingerprint reader: works with some effort and a good howto
- Software suspend: should work with hibernate (take a look at http://lochraster.org/t60/ for configuration files)
Conclusion: It’s definitely rocking hardware even though some parts are not yet working out of the box with Linux. Solid hardware, very powerful (thanks to dual-core), lots of options in the BIOS. I never ever heard the cpu fan, even though running ‘CONCURRENCY_LEVEL=2 make-kpkg’ on the SMP-enabled kernel. 8-)
Posted in Computer, English, Hardware | 3 Comments »
June 30th, 2006
# df -h
Filesystem Size Used Avail Use% Mounted on
/dev/hda2 -253298818094k 1.0k 0.0k 73% /
/dev/hda1 -25520091066k 1.0k 0.0k 5% /boot
# df --version
df (fileutils) 4.1
[...]
Upgrade auf aktuellere coreutils (5.2.1) bewirkt Wunder. ;-)
Posted in Computer, Hardware, Rants | 2 Comments »
June 20th, 2006

Zurück in Graz. Robocup war anstrengend aber durchaus interessant und lehrreich. Und weitere “Lessons learnt”:
- WLAN auf persischem SuSE debuggen ist not-amusing (aber am Schluss hab ich es für die Jungs doch noch hinbekommen, hehe)
- wenn ein bestimmter Modus im WLAN verboten ist (in unserem Falle “G”), sucht man “iwpriv $DEVICE set_mode $NUM”
- durch Glastüren kann man nicht gehen *boing* 8-)
- Bluetooth-Headsets sind unpraktisch, wenn jeglicher WLAN/Bluetooth-Betrieb untersagt ist ;-)
- es gibt in Deutschland zur Zeit keine Lokale ohne Leinwand/Großbildfernseher
- die Bremer Stadtmusikanten sind noch unbeeindruckender als erwartet
- es rockt, nach 22:30 Uhr in einer sonnenbestrahlten Stadt spazieren gehen zu können
Bilder vom ‘Mostly Harmless’-Team der TUG gibt es in der Webgallery. Die Roboter laufen selbstverständlich mit grml. :-)
So, zurück zu 2.6.17-grml…
Posted in Computer, Events | Comments Off on Robocup 2006: done
June 13th, 2006
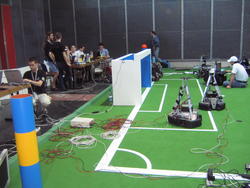
Seit Sonntag bin ich mit anderen Mitgliedern des Robocup-Teams der TUG bei der Robocup-Weltmeisterschaft 2006 in Bremen. Ich kümmere mich hier um die IT und EDV-Infrastruktur, auf den Robotern kommt natürlich ein angepasstes grml zum Einsatz. 8-) Lange Tage, wenig Schlaf, und wieder was dazugelernt:
- Extrawurst ist hier unbekannt (das Problem betrifft mich zum Glück nicht ;-))
- Käsesemmel gibt es beim Eurospar ums Eck nicht, man bekommt nur ein aufgeschnittes Weckerl (Selbstbedienung) und dazu Käse*scheiben*(!) [Gewichtseinheit, was das?] – und darf dann selbst basteln gehen
- Pago-Saft gibt’s hier auch nicht
- jeglicher Filterkaffee ist ungeniessbar (dabei könnten wir den wirklich gebrauchen)
- “Haake Beck” hat mit Bier nur wenig zu tun
Aktuelles von unserem Team gibt es im Webdiary nachzulesen. Der ZDF ist auch mit von der Partie und sendet immer wieder live und täglich ein “Best-of-the-day”. So, back to work…
Posted in Computer, Events, Links | 1 Comment »


